Replacing Your Vehicle Speed Sensor: A Step-by-Step Guide
Updated on January 31, 2026
If you’ve determined that your vehicle speed sensor (VSS) needs to be replaced, don’t worry – it’s not as difficult as you might think. With the right tools and a bit of know-how, you can replace your faulty VSS and get your car running smoothly again. In this post, we’ll provide a step-by-step guide on how to replace your VSS. Step 1: Safety First Before you start any repairs on your car, it’s important to take safety precautions. This includes wearing protective gear such as gloves and safety glasses, as well as securing your vehicle on a level surface with the parking brake engaged. Additionally, disconnect the negative battery cable to avoid any electrical shocks or accidental activation of the airbag system. Step 2: Locate Your Vehicle Speed Sensor The VSS is typically located on the transmission or transaxle of your vehicle. Refer to your car’s manual or online resources to determine the exact location of the VSS. Once you’ve located it, use a wrench or socket to remove any bolts or fasteners holding it in place. Step 3: Disconnect the Wiring Next, disconnect the wiring from the VSS. This may involve removing a clip or a connector, so be gentle and take your time to avoid damaging any wiring. Step 4: Remove the Old VSS With the wiring disconnected, you can now remove the old VSS from your vehicle. It may require a bit of force, so use a pry bar or other tool to carefully remove it. Step 5: Install the New VSS Now that you’ve removed the old VSS, it’s time to install the new one. Before doing so, inspect the area around the VSS for any debris or dirt that may have accumulated. Then, carefully insert the new VSS and secure it with the bolts or fasteners that you removed earlier. Step 6: Reconnect the Wiring Finally, reconnect the wiring to the new VSS. This may involve inserting a connector or reattaching a clip, so make sure it’s secure before moving on. Step 7: Test Your VSS With the new VSS installed and the wiring connected, start your vehicle and take it for a test drive. Check the speedometer and other functions that were previously affected by the faulty VSS to ensure that everything is working properly. You can also use professional diagnostic tools to test your VSS on your computer with more accurate results. As a conclusion, replacing a vehicle speed sensor (VSS) may seem intimidating, but with the right tools and a bit of know-how, it’s a straightforward process. By following our step-by-step guide, you can replace your faulty VSS and get back on the road in no time. Remember to take safety precautions and refer to your car’s manual or online resources for specific instructions on your vehicle.
If you’ve determined that your vehicle speed sensor (VSS) needs to be replaced, don’t worry – it’s not as difficult as you might think. With the right tools and a bit of know-how, you can replace your faulty VSS and get your car running smoothly again. In this post, we’ll provide a step-by-step guide on how to replace your VSS.
Step 1: Safety First
Before you start any repairs on your car, it’s important to take safety precautions. This includes wearing protective gear such as gloves and safety glasses, as well as securing your vehicle on a level surface with the parking brake engaged. Additionally, disconnect the negative battery cable to avoid any electrical shocks or accidental activation of the airbag system.
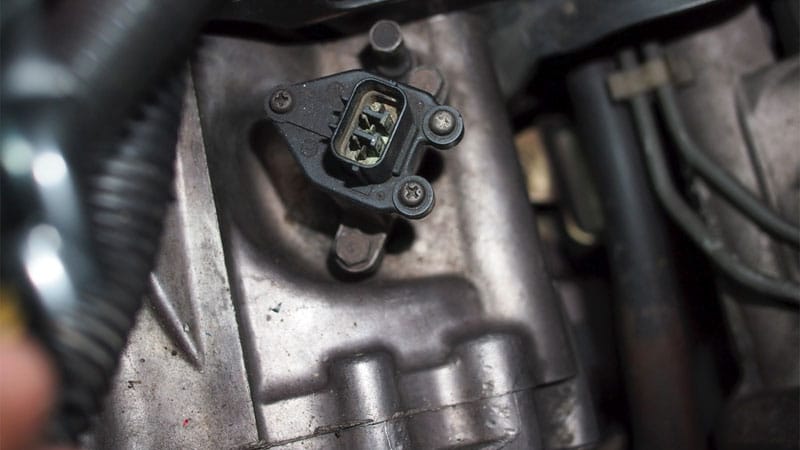
Step 2: Locate Your Vehicle Speed Sensor
The VSS is typically located on the transmission or transaxle of your vehicle. Refer to your car’s manual or online resources to determine the exact location of the VSS. Once you’ve located it, use a wrench or socket to remove any bolts or fasteners holding it in place.
Step 3: Disconnect the Wiring
Next, disconnect the wiring from the VSS. This may involve removing a clip or a connector, so be gentle and take your time to avoid damaging any wiring.
Step 4: Remove the Old VSS
With the wiring disconnected, you can now remove the old VSS from your vehicle. It may require a bit of force, so use a pry bar or other tool to carefully remove it.
Step 5: Install the New VSS
Now that you’ve removed the old VSS, it’s time to install the new one. Before doing so, inspect the area around the VSS for any debris or dirt that may have accumulated. Then, carefully insert the new VSS and secure it with the bolts or fasteners that you removed earlier.
Step 6: Reconnect the Wiring
Finally, reconnect the wiring to the new VSS. This may involve inserting a connector or reattaching a clip, so make sure it’s secure before moving on.
Step 7: Test Your VSS
With the new VSS installed and the wiring connected, start your vehicle and take it for a test drive. Check the speedometer and other functions that were previously affected by the faulty VSS to ensure that everything is working properly. You can also use professional diagnostic tools to test your VSS on your computer with more accurate results.
As a conclusion, replacing a vehicle speed sensor (VSS) may seem intimidating, but with the right tools and a bit of know-how, it’s a straightforward process. By following our step-by-step guide, you can replace your faulty VSS and get back on the road in no time. Remember to take safety precautions and refer to your car’s manual or online resources for specific instructions on your vehicle.
Need expert help with your setup?
Our team is ready to help you choose the right tools and get you up and running.